

How To Add Wordpress Blog Post To Custom Website
You've picked a theme and added some personal touches. It's time to publish! On WordPress.com, that means a post or a page.
Creating Posts
Posts are what you think of when you think of a blog; they're dated, and appear in reverse chronological order. They move down your blog as you publish new ones. They're browsable in the WordPress.com Reader, where prospective fans can find them under tags you assign them.
Pages are different — they're handy for timeless content, like an About or Contact Me pages.
Ready to publish a post? Get started by clicking the "Write" button on the right side of the toolbar at the top of your screen:

Or click onMy Sites, then Site and select Posts. Click theAdd New Post button to start a new blog post.

This will create a draft post on your blog and open up the post editor:

In the top field, insert a title. Go for clear and intriguing — if your title doesn't make someone want to click, your post isn't going to get read.
In the large area below the title, write your post. The WordPress Editor is made up of discrete elements calledBlocks. Content is created by adding different block types, with the default block type being a paragraph.
To add more interest, you can add Heading, Image, List, Quote and many other block types.

Each block has unique options for customizing the look of the block. Click into a newly added block and you'll see a menu above the block as well as to the right in Block settings with options like alignment, font size, color, and other features.

Now, let's add a picture. There are two ways to do this: you can drag the image files from your desktop right into the post where they'll be automatically uploaded and inserted, or you can use the tools within the editor.
To add an image click the + button:

Then, add an Image block. You can browse to the Image block icon, or type in "Image" in the search to find different types of Image blocks.
To upload an image from your computer, click Upload.

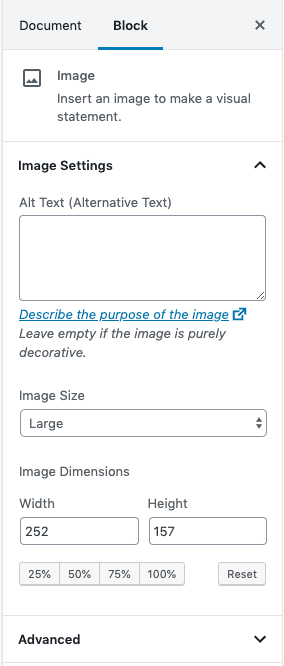
If you click on any image and then go to the Block settings on the right of your screen, you'll be able to give the image Alt Text and define the image size.
Once the image is in your post, you can choose its alignment and add a caption under the image. Click on the image to pull up these options:
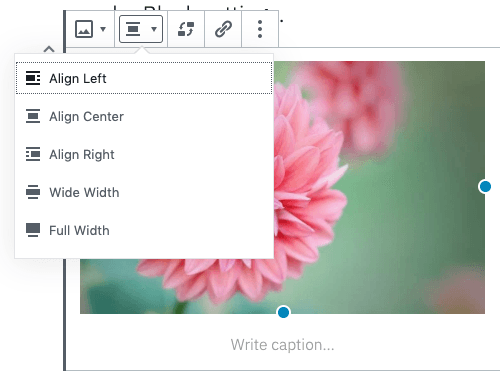
If you'd like to have your words wrap around the image, choose a right orleftalignment option. If you're using one of our newer themes, you'll see the option for Wide Width or Full Width.
You can also adjust the size of your image right in the post by clicking and dragging one of the dots at the image's edges. To remove the image entirely, click the Trash icon.
Your post is almost ready! Before clicking Publish, give your new post a few tags and categories — you'll see an area for that in the right-hand column:

I've given this post the "news" tag, (as well as one other) which will allow people browsing the "News" tag in the WordPress.com Reader to find my post, and the category "In the News" so people who visit my blog can find it among the other kinds of posts.
When you're ready to flip the switch, click Publish at the top of the page, confirm that you're ready to publish and click Publish again.

You'll see a notice that your post has been published and a link to the live post.
Congrats! You're a published blogger.
Creating Pages
Ready to try a page? The process is almost the same. Return toMy Sites— you can click My Sites on either the blue or black admin bars, depending on where you are on WordPress.com — but clickAdd New Page inSite → Pages instead of Posts:
The Page editor that appears looks just like the Post editor, and both writing and inserting images work in exactly the same way. The key differences between the Post and Page editors are:
- The Page editor has no area for tags and categories; pages don't use either of those.
- The Page editor includes aPage Attributes section that lets you create parent and child pages or change the order of pages — mysterious now, but helpful when you want to create a menu with drop-down submenus for your site.

As with posts, WordPress.com will auto-save your work every few seconds while you're drafting your page, and you'll click the samePublishbutton to publish your page for the world.
Creating Menus
Once you've published a page, you'll probably want to create a menu to make it easy for your readers to find it and move around your site. Go to My Sites → Design → Customize → Menus.

If your theme already has a default/primary menu, you can click on it to edit it. If your theme doesn't have a default/primary menu, click Create New Menu instead.


Type in a name for your menu, then click Create Menu.
You can create menu items that link to a page on your site, a link (either to your site, or anywhere at all), one of your categories or tags, or one of your posts. To re-order a menu item click and drag it. Click and drag an item to the right to nest it under another item. For more detail on menus, check out this guide.
Next up, we're going to learn what widgets are and how to use them to enhance your site. Let's head on over to Get Flashy.
How To Add Wordpress Blog Post To Custom Website
Source: https://wordpress.com/learn/get-published/
Posted by: garciagratin.blogspot.com
0 Response to "How To Add Wordpress Blog Post To Custom Website"
Post a Comment