

How Do I Pin A Tumblr Post To The Top Of My Blog
Tutorial: Pinned Post + "pin" icon
Difficulty: 2.18 / 5
Revised 19.08.2017
Note: re-type the quotation marks when you copy/paste codes from this tutorial into your HTML Editor
Find the post in the source code
We have to find the code for the post we want to pin in the source code, then copy/paste it into our HTML Editor, right before {block:Posts}, located below <body> .
{block:Posts} is the html block that generates posts on your blog. Theme makers use div tags (<div class="className">…</div>) to style this element.
Most themes have a div for the entire posts container
e.g.:
<div id="posts_container">...</div>
and a wrapper div for each post
e.g.:
<div class="entry">...</div>
The {block:Posts} block is located between these two divs, and it is visible only in the HTML Editor.

The post wrapper div has one general instance in the HTML Editor and several instances in the source code for each post, which will make it easier for us to find our post.
So, these are the codes we need to find:
- the opening wrapper div tag
- the actual post code
- the post info, tags, reblog/like, notes, etc. code
- the ending wrapper div tag
The following examples are based on my themes. Each theme maker names their ids/classes differently, so before proceeding to the next step, find out the id/class title of your post wrapper div tag.
Example 1

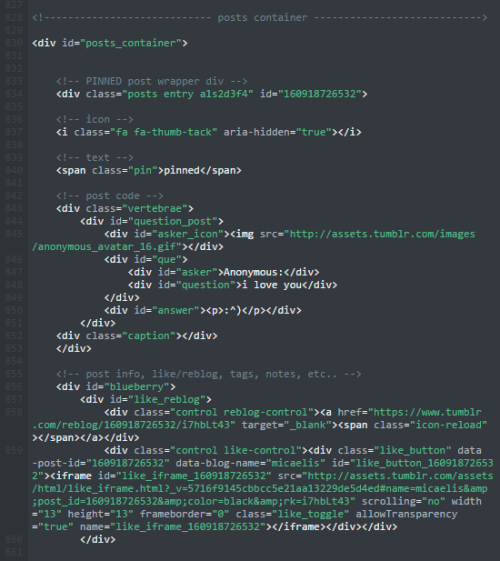
1) Go to the page of your blog where the post you want to pin is located > right-click > View Page Source. I don't recommend using permalink pages, sometimes the permalink and index page styles can differ.
Use keywords from your post to find the code faster by using ctrl+f, e.g. caption words, tags, the number of notes, the date, any info that makes that post unique on that page. In this case, I typed "i love you" in the search box.

If your post has no info or caption, open the HTML Editor, click on the gear icon in the upper left corner, select Find and Replace, type in {block:Posts} in the Search for box. Find the post wrapper div located immediately after {block:Posts} and copy that tag into the search box, e.g.: <div class="entry". If you want to pin the third post from the page, find the third <div class="entry" in the source code.
The green text in <!-- ... --> tags are invisible html comments.


Copy the code right before {block:Posts}
2) Open the HTML Editor on the Customize page and find the {block:Posts} block. It should be located somewhere below the <body> tag. We're going to copy / paste the code from the blue and red boxes from Example 1 source code between the posts container <div id="posts_container"> and{block:Posts}.

3) Update Preview > Save.

Make it visible only on the index page
4) If you want the pinned post to appear on every single page of your blog, including permalinks, tagged / search pages, you can leave the code as it is. But unless it's a really important information for your blog visitors, they might find it a bit annoying to see the same post at the top of every page they visit. In order to prevent that, you can make the pinned post visible only on the first page of your blog by including the following scriptright before </body>:
<script type="text/javascript">
if ((window.location.protocol + "//" + window.location.hostname + "/") != (window.location.href)) {
$(".a1s2d3f4").hide();
$(".a1s2d3f4").css({'height':'0'});
}
</script>
Again, don't forget to re-type the quotation marks.
5) Add a1s2d3f4 beside the other class title(s) in the post wrapper div that your pasted from the source code.a1s2d3f4 is a random class title I made up; you can come up with your own, just make sure it's unique in your code.

Add a 'pinned' icon or text
5) We'll use Font Awesome's 'thumb-tack' icon in this tutorial, but you're free to use whichever one you like. First, add the FA CDN right after <head>:
<link rel="stylesheet" href="https://maxcdn.bootstrapcdn.com/font-awesome/4.4.0/css/font-awesome.min.css">
then paste the following code right after the opening wrapper div tag (the first blue box in the source code):
<i class="fa fa-thumb-tack" aria-hidden="true"></i>
<span class="pin">pinned</span>
Add the following code right before </style> to customize the icon and text:
.fa-thumb-tack {padding-right:3px; vertical-align:middle; color:black; font-size:9px;}
.pin {color:black; font-size:7px; text-transform:uppercase; letter-spacing:1px;}

Final code:

Example 2
In this example, we're going to pin the ghibli gifset.

1) Right-click > View Page Source.
The "ghibli" tag makes the post unique on the page, so we're going to type that in the search box using ctrl + f.


Not every source code will be legible, but no worries. In the image from the link below, if we look carefully through the code, we'll find the opening wrapper div tag a few lines above our keyword (first red box). The closing </div> tag (second red box) should be near the next opening wrapper div instance (blue box). Notice the<div id="notecontainer"></div> between them. That's the wrapper div for post notes on permalink pages, meaning we don't need it for our pinned post.
Open full-res image.
Now we're going to copy the code starting with the first red box and ending with the second red box, and paste it before {block:Posts} in the HTML Editor.
2) Update Preview > Save

I hope this tutorial was helpful! Sorry if it was too verbose, I wanted it to be as clear as possible for anybody :)
How Do I Pin A Tumblr Post To The Top Of My Blog
Source: https://felinum.tumblr.com/post/161135625741/tutorial-pinned-post-pin-icon-difficulty
Posted by: garciagratin.blogspot.com
0 Response to "How Do I Pin A Tumblr Post To The Top Of My Blog"
Post a Comment